
GUIDE:Sakou Michi LS1 Dual Cans/truck PCV Install (w/ pics)
 07-17-2012, 06:47 PM
#1
Saikou Michi LS1 Dual Catch can installed with truck PCV Pics, routing, and instructions included)
So, I received my spiffy new Saikou Michi dual can setup last week, and I finally got around to installing it. I also noted that there wasn't a thread anywhere that had all of the information for the install in one spot... So I made one.
Here�s the crap you�re going to need:
-Saikou Michi LS1 Dual setup (DUH!)
-Two M10x1.5 bolts, around �� long (Auto Zone has them in a convenient two pack, in black to match the bracket even. Cost around $3
-7 or so feet of flexible fuel hose� I believe the size I bought was 7/16�. It seals just fine. Cost about $9 at Auto Zone.
-Hose clamps for the fuel hose. I just bought three of the four-packs at Auto Zone, and had one or two left over. $3 EA.
-A 3/8� Vacuum Cap
-One of the new orifice PCV�s (Autozone PN PCV1009, AC Delco #12572717, AKA CV339) $3
-A foot of 1� Heater hose from Lowes (you only need like 3 inches, but you have to buy in 1ft increments. $2.04
-brass 3/8� barb to threaded adapter. (Lowes) $2
-two more hose clamps that will fit around the heater hose.
NOW, LET�S GET STARTED. The steps don�t necessarily have to be done in this order, this is just how I did it.
1) pull all the the PCV/Valve cover vent hoses and connectors off. There is a vent on the back of the driver side valve cover tee�d in with one from the rear of the passenger valve cover. This continues forward up the passenger side and connects to the PCV, then to the intake manifold. Pull that crap off. There is also a hose going from the front of the passenger valve cover going to the throttle body. Pull it off as well.
2) Put a vacuum cap on the rear passenger side valve cover vent and clamp it.
3) Go ahead and make your housing for the new PCV. This is how- (The how-to is in the first post, and has pictures to boot) http://www.ls1.com/forums/f6/pcv-val...ication-80151/ The only thing I changed was using two hose clamps instead of one, and I eliminated the "ground" strap because it is not needed.
4) Bolt your catch can bracket to the passenger side head with the M10x1.5 bolts. You can see in this pic:
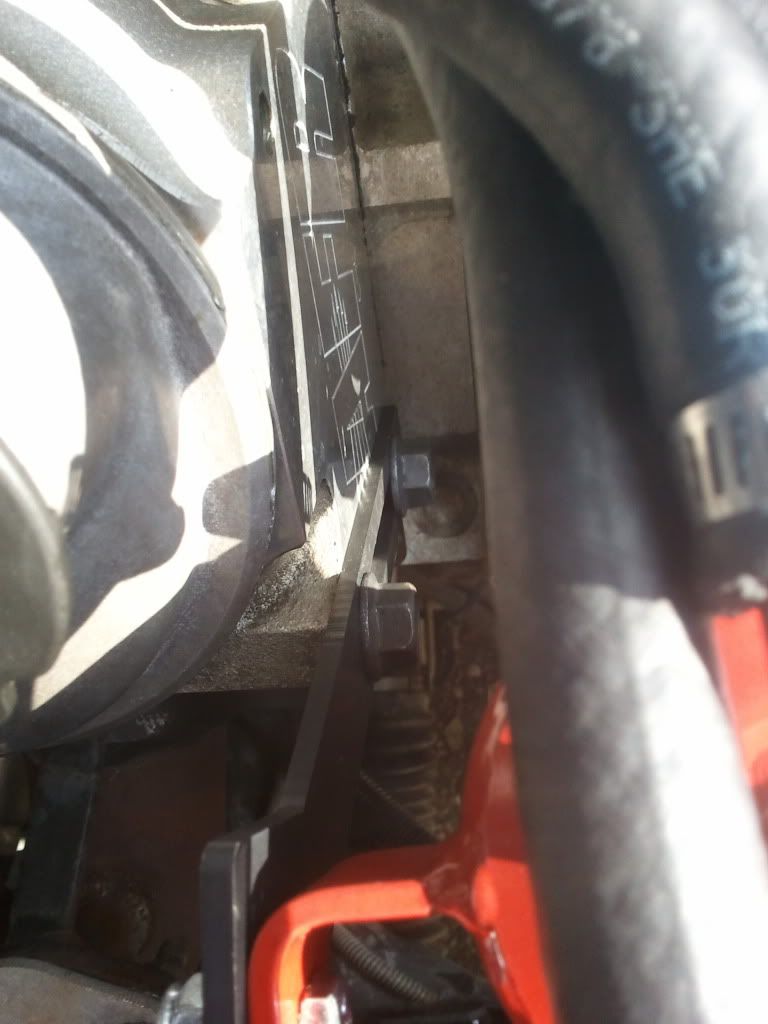
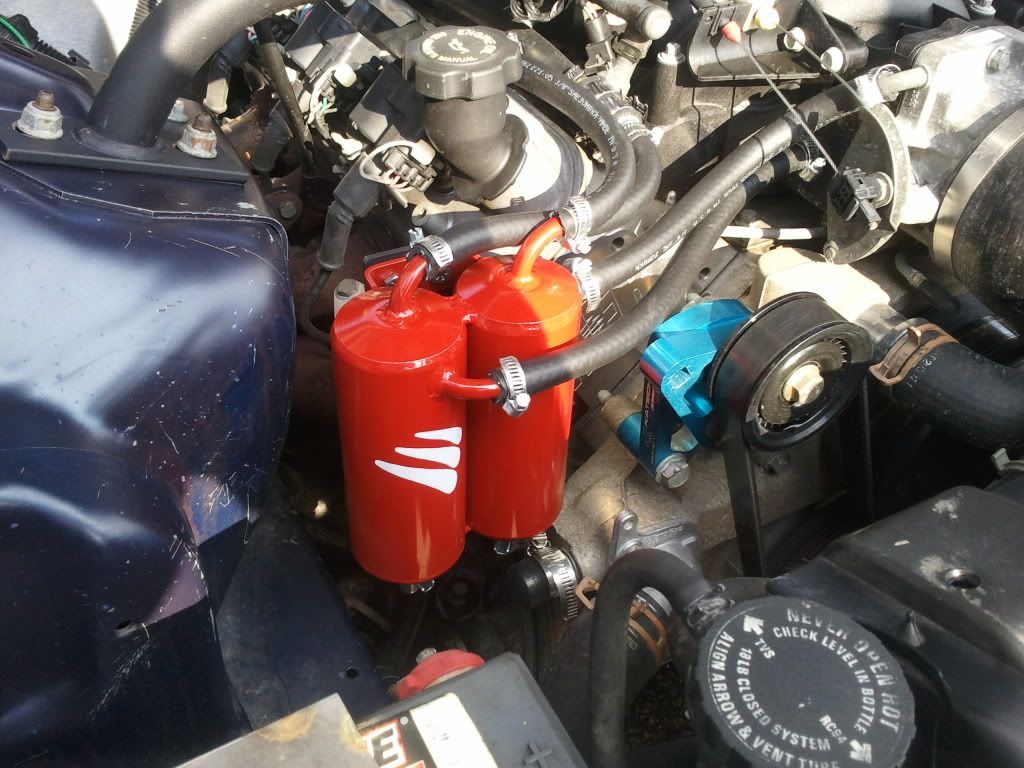
5) Bolt your dual can setup to the bracket using the hardware supplied by Saikou Michi. It should be sitting like this (Well, minus the hoses, we're getting to that:
6) Connect the end of your fuel hose to the vent on the rear of the driver side valve cover and clamp it. Run the hose from the around the back of the engine, down the passenger side and to the top of one of the cans. Mark where you need to cut, and, well� cut it. Then clamp it.
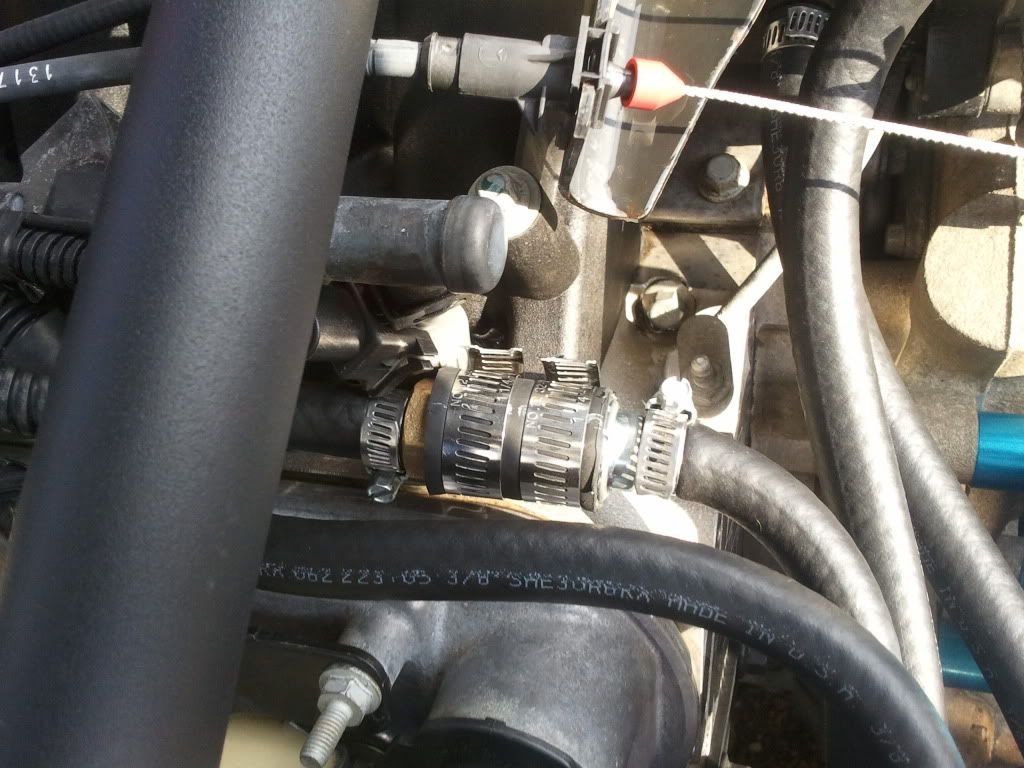
7) Find a spot in the hose where you can put your PCV housing. Cut out a section of hose and put the PCV housing in place, and clamp it. Here's where I put mine:
8) Measure out a piece of fuel hose going from the other fitting on the same can to the nipple on the intake manifold, and clamp it in place.
9) Measure a piece of fuel hose from the front vent on the passenger side valve cover to the top of the other can, and clamp it.
10) Measure a piece of fuel hose from the other fitting on the can to the nipple on the throttle body, and clamp it.
VOILA! Catch can installed.
Your routing should look something like this:

For an easy-to-follow diagram: (thanks to 405HP Z06. The image is his, located in another thread)

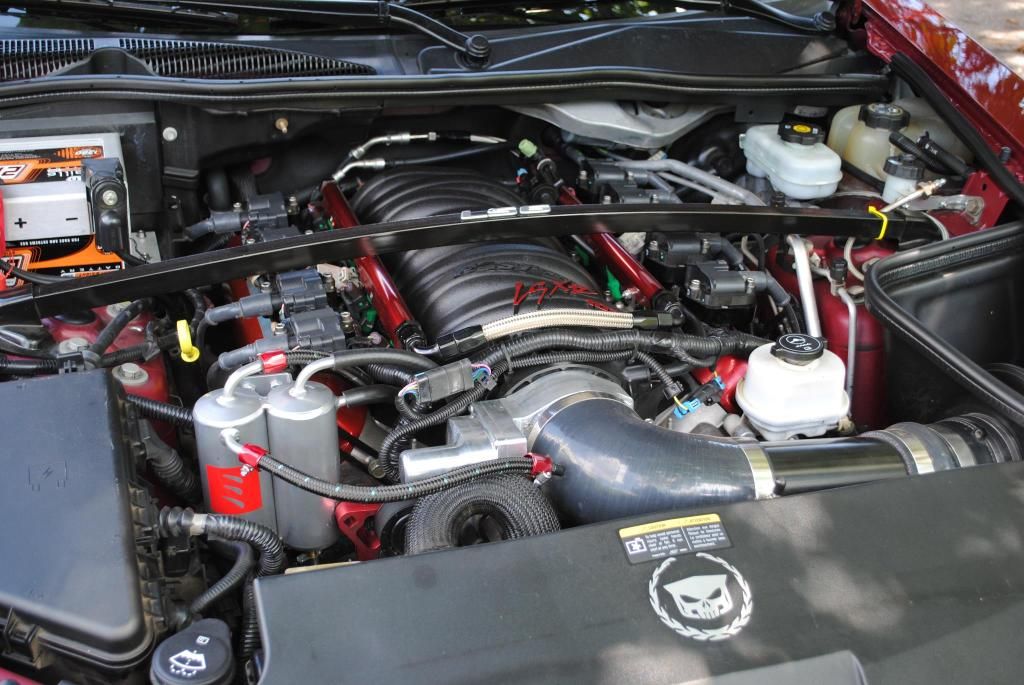
AAAND, an engine bay shot:
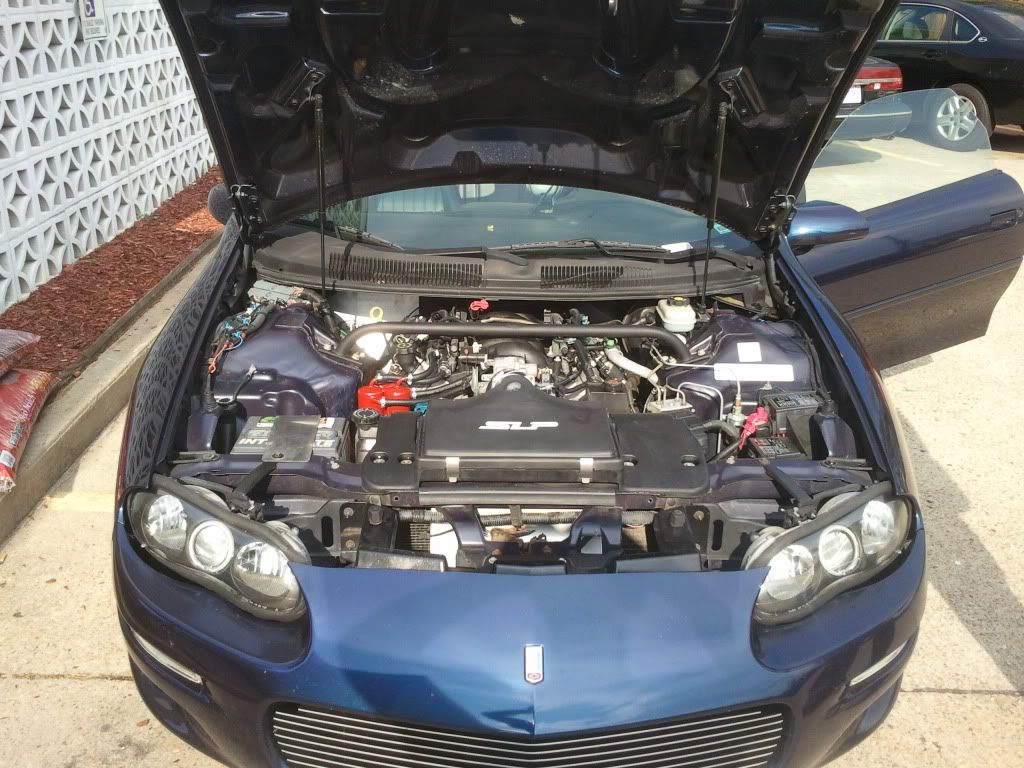
Looks pretty sleeperish, I think.
Hope y'all find this useful. On a side note, I also did a bottom end flush and switched over to Rotella T6, I'll report back in on that in a few weeks, as far as how the new PCV and catch cans affected my oil consumption.
So, I received my spiffy new Saikou Michi dual can setup last week, and I finally got around to installing it. I also noted that there wasn't a thread anywhere that had all of the information for the install in one spot... So I made one.
Here�s the crap you�re going to need:
-Saikou Michi LS1 Dual setup (DUH!)
-Two M10x1.5 bolts, around �� long (Auto Zone has them in a convenient two pack, in black to match the bracket even. Cost around $3
-7 or so feet of flexible fuel hose� I believe the size I bought was 7/16�. It seals just fine. Cost about $9 at Auto Zone.
-Hose clamps for the fuel hose. I just bought three of the four-packs at Auto Zone, and had one or two left over. $3 EA.
-A 3/8� Vacuum Cap
-One of the new orifice PCV�s (Autozone PN PCV1009, AC Delco #12572717, AKA CV339) $3
-A foot of 1� Heater hose from Lowes (you only need like 3 inches, but you have to buy in 1ft increments. $2.04
-brass 3/8� barb to threaded adapter. (Lowes) $2
-two more hose clamps that will fit around the heater hose.
NOW, LET�S GET STARTED. The steps don�t necessarily have to be done in this order, this is just how I did it.
1) pull all the the PCV/Valve cover vent hoses and connectors off. There is a vent on the back of the driver side valve cover tee�d in with one from the rear of the passenger valve cover. This continues forward up the passenger side and connects to the PCV, then to the intake manifold. Pull that crap off. There is also a hose going from the front of the passenger valve cover going to the throttle body. Pull it off as well.
2) Put a vacuum cap on the rear passenger side valve cover vent and clamp it.
3) Go ahead and make your housing for the new PCV. This is how- (The how-to is in the first post, and has pictures to boot) http://www.ls1.com/forums/f6/pcv-val...ication-80151/ The only thing I changed was using two hose clamps instead of one, and I eliminated the "ground" strap because it is not needed.
4) Bolt your catch can bracket to the passenger side head with the M10x1.5 bolts. You can see in this pic:
5) Bolt your dual can setup to the bracket using the hardware supplied by Saikou Michi. It should be sitting like this (Well, minus the hoses, we're getting to that:
6) Connect the end of your fuel hose to the vent on the rear of the driver side valve cover and clamp it. Run the hose from the around the back of the engine, down the passenger side and to the top of one of the cans. Mark where you need to cut, and, well� cut it. Then clamp it.
7) Find a spot in the hose where you can put your PCV housing. Cut out a section of hose and put the PCV housing in place, and clamp it. Here's where I put mine:
8) Measure out a piece of fuel hose going from the other fitting on the same can to the nipple on the intake manifold, and clamp it in place.
9) Measure a piece of fuel hose from the front vent on the passenger side valve cover to the top of the other can, and clamp it.
10) Measure a piece of fuel hose from the other fitting on the can to the nipple on the throttle body, and clamp it.
VOILA! Catch can installed.
Your routing should look something like this:
For an easy-to-follow diagram: (thanks to 405HP Z06. The image is his, located in another thread)
AAAND, an engine bay shot:
Looks pretty sleeperish, I think.
Hope y'all find this useful. On a side note, I also did a bottom end flush and switched over to Rotella T6, I'll report back in on that in a few weeks, as far as how the new PCV and catch cans affected my oil consumption.
Last edited by roninsonic; 07-18-2012 at 05:20 AM.
 07-18-2012, 10:42 AM
#2
Also, a side note- It would probably be easier to pull the vent itself out of the driver side valve cover, put the new hose on, and reinstall the vent in the orientation you want, then run a bead of high-temp RTV around the base of it for some insurance. That's what I wound up doing. It's cramped back there.
07-18-2012, 01:56 PM
#4
TECH Fanatic
iTrader: (7)
Join Date: Oct 2005
Location: Western NY
Posts: 1,416
Likes: 0
Received 0 Likes
on
0 Posts

You literally have the same setup as me. The PCV valve setup and hose routing are exactly alike, the only thing that's different is that my dual can setup is gloss black.
07-19-2012, 09:53 PM
#6
From my understanding, the clean side provides fresh, metered air to the crankcase for ventilation.
07-31-2012, 10:04 AM
#7
Just as an update: I drained my cans for the first time yesterday, after about a thousand miles of relatively spirited driving and two Saturday nights' worth of beating the living **** out of it... HOLY ****. The clean side was about a quarter full, and the dirty side was 3/4 full... And that's just after a thousand miles (admittedly, a pretty rough thousand). At least now I know where my oil's been going. As a side note, The oil flush did WONDERS. My oil still looks new (I did have to top it off, because I'd rather DRINK the **** in the cans than put it back in my motor), and my gas mileage has increased by about 10% with no change in driving habits... Keep in mind that I'm using Rotella T6 (5w40) now.
All in all, I'd say it was a worthwhile way to spend about 200 bucks.
All in all, I'd say it was a worthwhile way to spend about 200 bucks.
Trending Topics

 08-01-2012, 06:40 PM
#10
Nice write up. Your routings are spot on and very helpful. In addition if you have an LS2 style DBW throttle body, you can ask them to change the angle of the tube nipple to route it to the air intake tube like I did. Those guys are great to work with.
08-11-2012, 12:05 AM
#14
Teching In

Nice Info. I have the Saikou Michi CC , all as said previous, a work of art. Not a perfect fit with the A/C lines but some moving and squirming and it fits up nice. See the pic, I suspect that I won't be able to do this bumper art any longer. Home track is Road America which taxes every aspect of a car. HERE is THE ?????
Just want to make sure that the direction of flow through the PCV valve is from the back of the car towards the front which will flow into inlet side (top) of either or catch can then into the intake manifold. Zoom in on the bumper, think I need a catch can?
Just want to make sure that the direction of flow through the PCV valve is from the back of the car towards the front which will flow into inlet side (top) of either or catch can then into the intake manifold. Zoom in on the bumper, think I need a catch can?
Last edited by NoRegretSS; 08-11-2012 at 12:10 AM. Reason: Picture problem
08-13-2012, 09:41 PM
#15
Nice Info. I have the Saikou Michi CC , all as said previous, a work of art. Not a perfect fit with the A/C lines but some moving and squirming and it fits up nice. See the pic, I suspect that I won't be able to do this bumper art any longer. Home track is Road America which taxes every aspect of a car. HERE is THE ?????
Just want to make sure that the direction of flow through the PCV valve is from the back of the car towards the front which will flow into inlet side (top) of either or catch can then into the intake manifold. Zoom in on the bumper, think I need a catch can?
Just want to make sure that the direction of flow through the PCV valve is from the back of the car towards the front which will flow into inlet side (top) of either or catch can then into the intake manifold. Zoom in on the bumper, think I need a catch can?
AND HOLY CRAP, your rear bumper is FILTHY. Are you sure that's not fuel or general track grime?

