Replace Your Antenna Mast - A How-to
 08-16-2011, 11:01 AM
#1

My power antenna failed on me in the up position. This is caused by the nylon cable breaking inside the motor housing. I had to remove the 10mm screw that holds the lower motor housing to the car and then loosened the silver mast-to-motor bracket and then loosened the set screw holding the mast tube in place. I pulled the mast tube out of the housing with the mast and cable coming with. Only then did I have enough room to get the antenna out. So I purchased a replacement mast on eBay before I found out GM's part # 10256439 is the GM replacement. Part # 10402860 is the entire motor and mast assembly. The mast is removed by loosening a screw in the middle of that metal silver bracket that attaches it to the motor head and a set screw on the opposite side that we're working on. Loosen the two small gold-colored screws holding the motor down (or remove them) and pull the motor up to disengage the gears (or pull it out and let it hang by the wires). Pull the mast and nylon cable out. Since the cable was broken and a piece still inside the winding, I had to take the motor assembly apart. One side has 4 'rivets,' this is the side we need to work with. Drill just the head of those rivets CAREFULY! I wasn't so careful and I'll show you what happened later. You could use a Dremel to grind them off too and that's what I SHOULD have done.

I took out and cleaned the black dirty grease off each piece (which I will not show since it's the opposite of assembly which I AM showing). It was so gummed up and dirty that I couldn't take good pics to show WTF I was doing. So I photographed the re-assembly process. There are some really small washers so read this all the way thru so you can expect them and not lose em.
From fully disassembled the only piece remaining is this white gear off center. Clean it best you can and clean out the inside of the housing. I smeared everything with synthetic grease (red goo) as I put it back together.

Re-install that gear with the nipple flat side up.
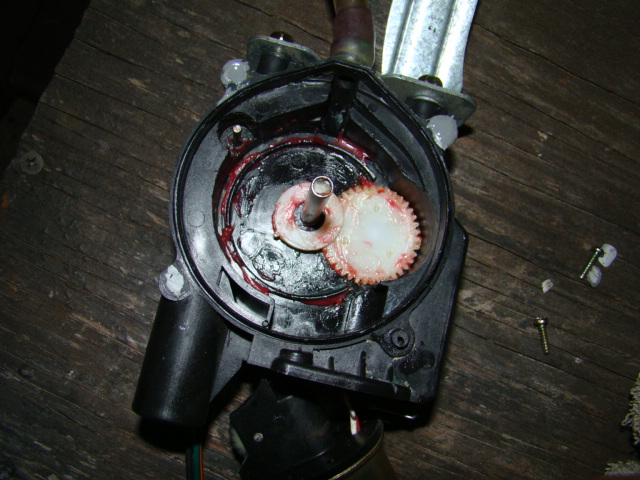
Re-install the LARGE gear. I greased the teeth. I didn't pull all the white grease out of the grooves in the top, there just wasn't a point to doing that. The two towers should face up.
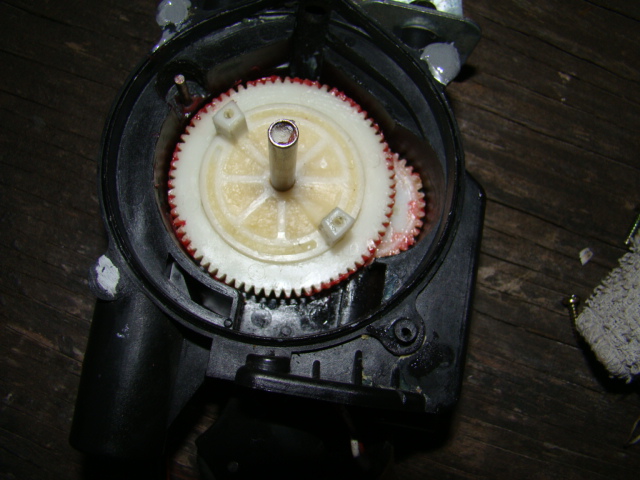
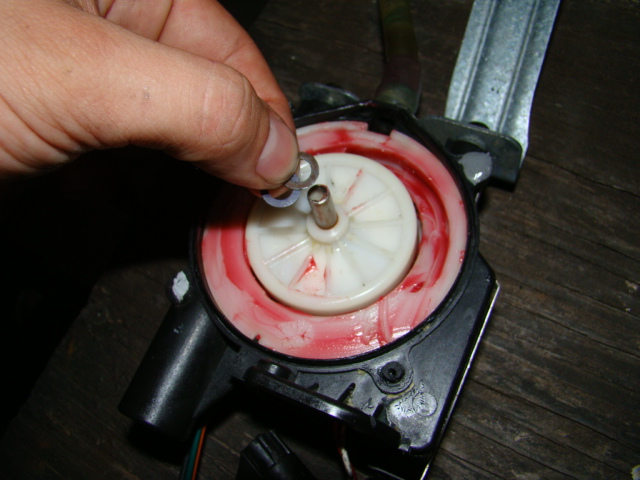
Grease and install the roller shown upper left.
Cont'd next page.
I took out and cleaned the black dirty grease off each piece (which I will not show since it's the opposite of assembly which I AM showing). It was so gummed up and dirty that I couldn't take good pics to show WTF I was doing. So I photographed the re-assembly process. There are some really small washers so read this all the way thru so you can expect them and not lose em.
From fully disassembled the only piece remaining is this white gear off center. Clean it best you can and clean out the inside of the housing. I smeared everything with synthetic grease (red goo) as I put it back together.
Re-install that gear with the nipple flat side up.
Re-install the LARGE gear. I greased the teeth. I didn't pull all the white grease out of the grooves in the top, there just wasn't a point to doing that. The two towers should face up.
Grease and install the roller shown upper left.
Cont'd next page.
 08-16-2011, 11:10 AM
#2
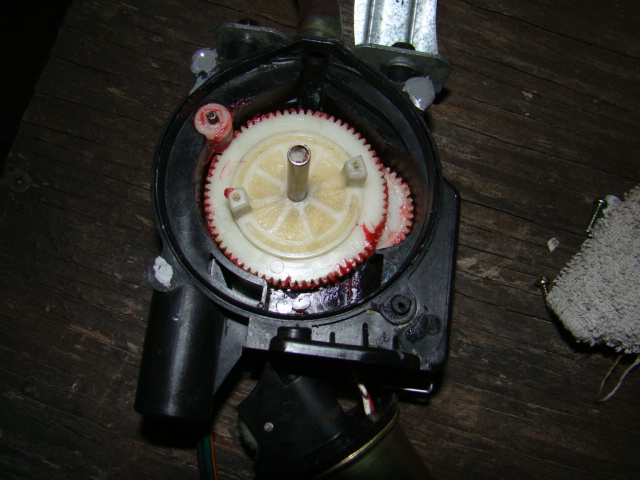
Smear the cable guide with grease and re-install it. You'll notice there's a small hole for the shaft that the roller sits on, line those up.
Install the inner cable roll guide and the two small washers. I greased the outside edge.
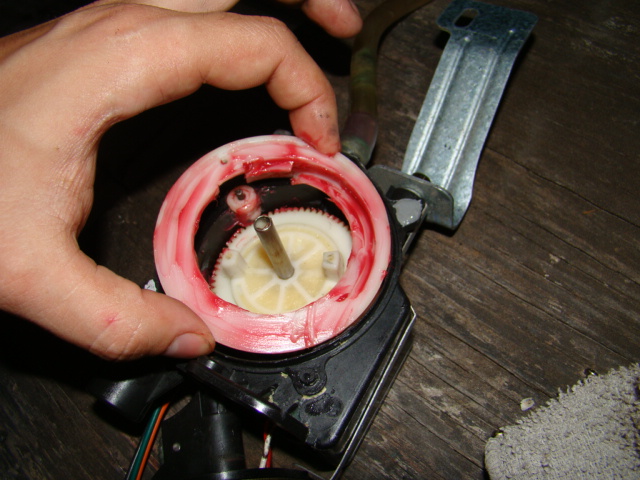
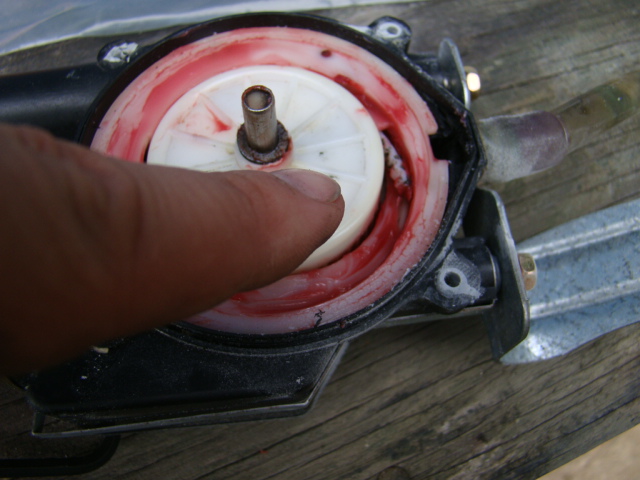
With the mast collapsed, insert the mast's cable with the teeth towards the inside. It'll take a little wiggling to get it to go up the ramp. Stop with the end of the cable on the ramp as shown (see pointing finger). Make sure you run it through the small loop of the silver mast-to-motor bracket.
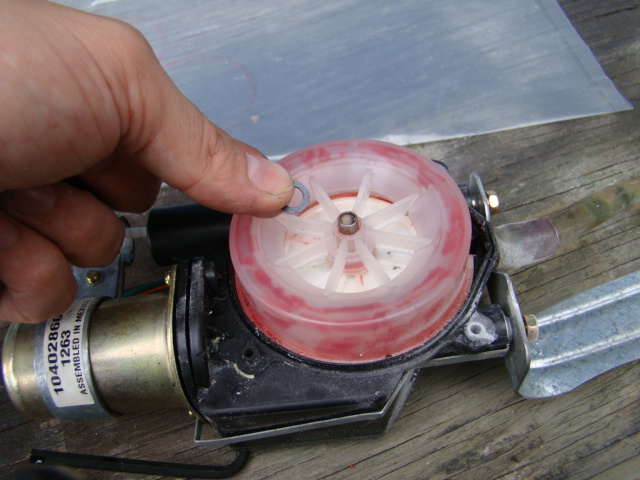
Install the Wound Cable Housing after greasing the inside surfaces and place the single washer on top.
Now depending on the size screws you got, drill holes in the main housing. The cover should have open holes where the rivets had gone thru. You can see how I repaired my damage from excessive drilling. I filled my large holes with JBWeld, shaved it back flat then drilled my screw holes.

Cont'd next page.
Install the inner cable roll guide and the two small washers. I greased the outside edge.
With the mast collapsed, insert the mast's cable with the teeth towards the inside. It'll take a little wiggling to get it to go up the ramp. Stop with the end of the cable on the ramp as shown (see pointing finger). Make sure you run it through the small loop of the silver mast-to-motor bracket.
Install the Wound Cable Housing after greasing the inside surfaces and place the single washer on top.
Now depending on the size screws you got, drill holes in the main housing. The cover should have open holes where the rivets had gone thru. You can see how I repaired my damage from excessive drilling. I filled my large holes with JBWeld, shaved it back flat then drilled my screw holes.
Cont'd next page.
08-16-2011, 11:21 AM
#3
Place the housing on top. Notice I have 3 longer screws and one shorter one. 3 holes go through the housing while one doesn't near the motor, I could have used all 4 short screws but I was using what I had laying around my shop. Insert and tighten the screws.

Hold the cable firmly to prevent it from twisting and push it into the housing. When it's almost completely in, slide the mast housing tube over the mast and push it down into the housing until it stops firmly. Tighten the set screw then push the mast all the way in.

Replace the motor and tighten it's two screws.

Replace the silver mast-to-motor bracket and tighten the screw in the middle.

Put the power mast assembly back into your car and plug in the power wires and the antenna cable. Have a seat in your car and turn it and the radio on and observe the antenna. Turn the car off, pull the key and open the door...Admire your antenna as it retracts again as it's supposed to! After doing this my antenna is a LOT quieter than before and I can't hear it at all even.
Side note:
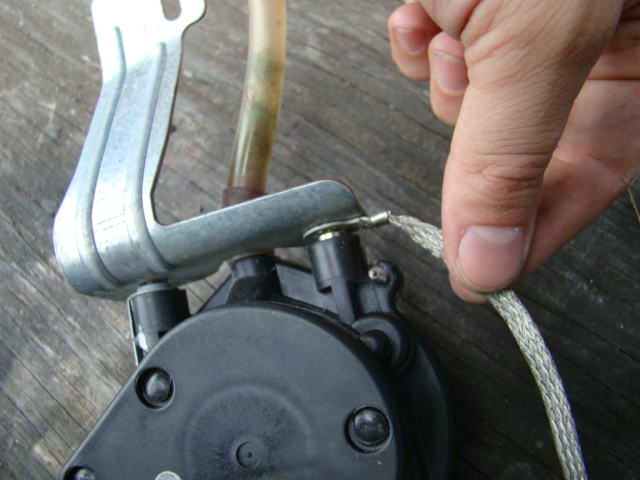
Make sure your ground strap is connected like this:
Hold the cable firmly to prevent it from twisting and push it into the housing. When it's almost completely in, slide the mast housing tube over the mast and push it down into the housing until it stops firmly. Tighten the set screw then push the mast all the way in.
Replace the motor and tighten it's two screws.
Replace the silver mast-to-motor bracket and tighten the screw in the middle.
Put the power mast assembly back into your car and plug in the power wires and the antenna cable. Have a seat in your car and turn it and the radio on and observe the antenna. Turn the car off, pull the key and open the door...Admire your antenna as it retracts again as it's supposed to! After doing this my antenna is a LOT quieter than before and I can't hear it at all even.
Side note:
Make sure your ground strap is connected like this:
04-27-2013, 08:02 PM
#4
On The Tree
iTrader: (1)

Join Date: Jul 2011
Location: Hanover, PA
Posts: 116
Likes: 0
Received 0 Likes
on
0 Posts
I just used this how-to to repair my power antenna. The guide was definitely helpful but there were a couple of important notes missing.
1) When removing the motor from the housing be extra careful that the metal cap does not seperate from the plastic base. If it does separate far enough the brushes will fall out. Putting them back in is not fun at all. I highly recommend that once you remove the motor from the housing (wires still attached) put a piece of wire (twist tie) through the screw holes to keep everything together until you are ready to put it back together.
2) Going all the way back before the first step of assembly, when you have everything broken down you will see that there is another plastic gear on the back side of the assembly that you cannot access from this side. All that you can really see of it is the center "D" hole. Although I cannot outright prove my theory I believe that this gear is responsible for setting the stops for the up-down motion of the antenna. This is based on the fact that once I had everything assembled and tested the function, the antenna moved about half way up with the power turned off. When I turned the power on, it moved down about 2 inches. I had to take the motor off again to remove the mast. With the motor off I moved the main gear inside about 3 turns towards the mast and reassembled. Worked perfectly afterwards.
08-31-2014, 03:25 PM
#5
Teching In
Join Date: Sep 2010
Posts: 20
Likes: 0
Received 0 Likes
on
0 Posts
Thanks to Swiat34 for the great info.
I would like to add that I almost put the assembly back together without finding the broken cable/gear it was hidden inside the drum (the first thing you remove)
Also if you do remove the motor from the gear unit don't panic you can put the armature back in by sliding the gold cover off and resetting the brushes on the armature not that bad there are hooks to put the brush wires on I used some thread to pull the wires back in place once the armature and brushes are set.